

Multiboot USB – Kali, Kon-Boot and More
What’s going on guys?
At this point you should know I love my crafty USBs with a lot of utility. So for this post I wanted to make one including pretty much everything I use:
- Kali Linux
- Kon-Boot
- Hiren’s Boot CD
- Clonezilla
- Windows Installers
- and more…
The main idea is that instead of carrying several USBs around, we can simply buy one big USB – I recommend at least 64gb or more – and have everything configured in one swiss hacker USB. 😀
We will create this USB under Windows operating system using a tool I just found out about called YUMI – Your Universal Multiboot Installer.
Now besides these Linux distributions and tools I’ve mentioned above, I wanted to provide a way for you to further add any disk images or whatever you like to the USB, that’s where YUMI comes into play.
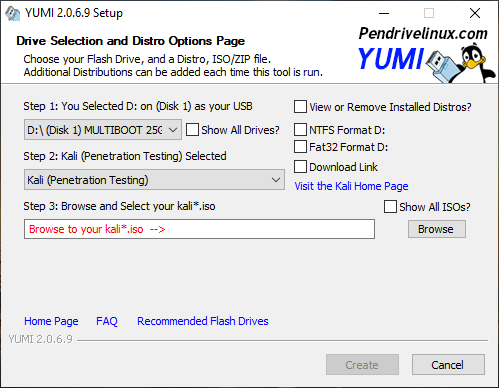
Using YUMI is incredibly easy, you just have to select your USB drive and then on step 2 you select whatever Linux distribution or disk image you would like to add to the USB. Finally browse for ISO itself on step 3.
When you’re adding the first ISO, I recommend formatting the drive. I went ahead and formatted it as Fat32 since that is widely recognizable by most operating systems. I believe you should use NTFS mostly if you want to make a USB with several Windows installers or live system.
Now I found this tool to work best if you add an ISO and then immediately reboot your computer into the USB to try it out and make sure it works. I had issues when trying to add all ISO’s at once.
Anyway let’s get into the guide.
Kali Linux with Persistence
First we’ll add Kali Linux. Go ahead and select your USB in step 1 followed by Kali in the drop-down list for step 2. Then you’ll have to browse for the Kali ISO that you download from their website. Finally hit create.
A quick tip to add persistence to your Kali installation: using a program such as AOMEI Partition Assistant or GParted you can create a new partition to your USB and then format it as ext4 Linux type.
Once you boot into Kali (as Live Persistence mode) you go ahead and mount that partition you created, and create a persistence.conf file inside.
Now add the following content inside the file:
/ union
Kali will now recognize and mount it during boot as your persistence partition.
Further Additions
Depending on your use case you’ll want to add more to your USB. As you probably noticed YUMI’s step 2, there’s plenty of welcome additions that you can browse through and download on the spot.
I figure I’ll go ahead and mention some of the stuff I end up using the most:
- Live Linux distributions
- Antivirus rescue to help you clean up contaminated systems
- Diagnostic tools to check up on hardware
- System administration live distributions and also penetration testing live distributions as well like Kali Linux
- Operating system installers for Windows and Linux
- Disk cloning and data recovery
- Password recovery and bypass
Anyway that’s it for this post. Go ahead and create your own USB with your favorite systems and tools. If you find any great uses for it don’t hesitate to share with us below in the comment box. Enjoy now! 😉


Leave a Comment