

Hello guys.
In this post we’ll take a look at how to setup Apache, MySQL and PHP on Windows and Linux. This setup is mainly for a series of SQL injection labs that I’ll be posting in the upcoming days (you’ll find the link for the HTML/PHP below). For this reason, it will be a development setup not a secure one. 😉
What will be covered:
- Installation of Apache, MySQL and PHP
- Configuration of each service where needed
- Creating MySQL user, database and grant privileges
- Download HTML/PHP pages and configure it properly
Since I’ll be doing a series of SQL injection posts, I figured it would make sense to create this post given that understanding the installation process, database users/permissions all contribute to the vulnerability.
With that said, let’s begin!
– Download HTML/PHP/Database
Start by downloading the HTML, PHP and database files from the link above. Extract the zip file and hang on to the files for now, we’ll use them shortly after installing Apache, MySQL and PHP.
Windows Apache, MySQL and PHP Setup
To make development easier under Windows, we’ll go ahead and use XAMPP. This will take care of installing Apache, PHP and MySQL at once. Optionally you can install other plugins like WordPress although not required for this tutorial.
- Download and install XAMPP.
- Once installation completes, run the control panel.
- Under Actions, start the Apache and MySQL services.
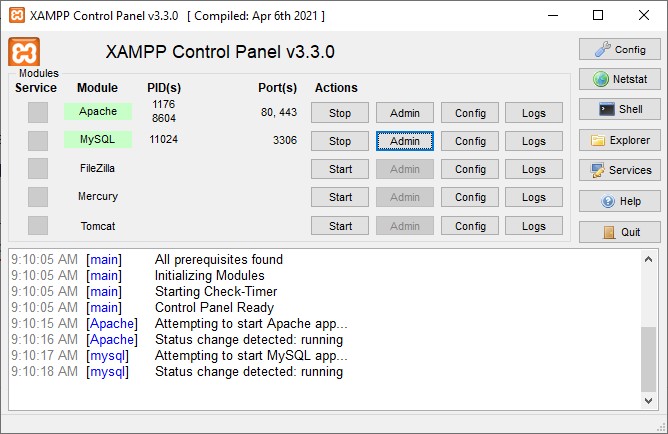
If everything went well your control panel should look like this:
You should be able to test it by navigating to http://localhost/ in any browser. If you are able to access the default XAMPP screen you should be good to go.
Now all you have to do is copy the ‘arcane‘ folder you downloaded above to the following directory:
C:\xampp\htdocs\
Once that’s done you can access the website with the link:
http://localhost/arcane/
Not all pages will be working just yet, since we still have to create the database. But, before we do that, let’s create a user and grant privileges to all databases for easier access.
Database Privileges
In the XAMPP control panel, click on ‘Admin‘ under the MySQL actions. This will open phpMyAdmin.
On the home screen, look for ‘User accounts‘ on the top menu bar buttons.
Click on ‘Add user account‘.
For user name enter: 4fx
For password enter: logmein
Make sure host name is: %
Then for ‘Global privileges‘ just select the ‘Check all‘ box. Click on Go at the bottom of the screen.
That should grant privileges to all databases. If you would like to use a different user name and password, you will have to modify the web pages with the exact user name and password you want.
Creating Database
Start by clicking on ‘Home’ in MySQL’s phpMyAdmin page (top left, under the logo).
Click on ‘Databases‘ then for create database name enter: arcane
Then go ahead and create it by hitting the Create button.
You should now see the arcane database on the left databases, click on it.
Now click on ‘Import‘ in the phpMyAdmin top menu bar. Then click on “Choose File”.
I exported a copy of the database on the root directory of the zip file called ‘arcane.db‘. Go ahead and select it. Under a default installation it should be on:
C:\xampp\htdocs\arcane\arcane.db
Once its selected, just hit the “Go” button at the bottom of the import page.
If you see all green colored query results, you are good to go. If there’s any red colored queries, something was done incorrectly, check the spelling on everything or leave a comment below.
Linux Apache, MySQL and PHP Setup
Installing Apache, MySQL and PHP under Linux is easier since many distributions already come with it preinstalled – which is the case for my favorite distribution: Slackware Linux.
In any case, for most Debian-based distributions, it should be a matter of running the following commands in a terminal:
sudo apt update
sudo apt upgrade
This will update your system. Then to install Apache:
sudo apt install apache2For MySQL, download the package from this repository. Then install it like so:
sudo apt install ./mysql-apt-config_0.8.22-1_all.deb
sudo apt install mysql-server
Like I mentioned previously, many distributions will offer these packages on a full installation which will simplify the process since you won’t have to install anything later.
Now we just need to modify a few files in Apache for PHP configuration. Note that these files’ locations may vary depending on which distribution you are using, so google it to confirm you got the right one.
Modify /etc/httpd/httpd.conf as root to include PHP at startup (uncomment or add this line):
Include /etc/httpd/mod_php.confHint: When modifying these configuration files, I prefer to open a text editor as root/sudo and just Ctrl+F to find the exact line of text instead of just scrolling down manually. 😉
Next we’ll modify the directory module to use .php pages for website indexes, search for this line:
<IfModule dir_module> DirectoryIndex index.html </IfModule>Modify it to allow for .php files, like so:
<IfModule dir_module> DirectoryIndex index.html index.php </IfModule>If you notice that your Apache configuration files already have these changes made, then you don’t have to apply any modifications since different distributions will have this setup in place to begin with.
Once that’s done just restart the Apache server and PHP should be good to go.
You can create a test file in /var/www/ directory called index.php with the following content to test it:
<?php phpinfo(); ?>At this point you are ready to extract the zip file into the /var/www/ directory so it looks like this:
/var/www/arcane
Test it by running Apache and using a browser, navigate to: http://localhost/arcane/
Create Database
All we have to do now is create the database, user and import the content.
Let’s start by login in to MySQL from a terminal:
mysql -u root -pThe password should be blank under a default install, so just hit enter to login.
Once in MySQL, run the following command to create the arcane database:
CREATE DATABASE arcane;Then let’s create a user and grant privileges to the database:
CREATE USER '4fx'@'localhost' IDENTIFIED BY 'logmein';
GRANT PRIVILEGE ON arcane.* TO '4fx'@'localhost';
Now you can exit out of MySQL and from a regular terminal run the following command to import the database content included inside of the zip file I linked above:
mysql -u 4fx --password='logmein' arcane < /var/www/arcane/arcane.dbThat should import all of the content into the database we create previously.
This concludes the configuration for Apache, MySQL and PHP.
If you have any issues don’t hesitate to leave a comment below! 🙂


[…] it in your own computer, I’ve made a tutorial for Windows and Linux which can be found here: SQL injection labs (part 1). Even if you don’t want to go thru the whole setup, you should download the pages to see the […]